Writing a private voting smart contract in Aztec.nr
In this tutorial we will go through writing a very simple private voting smart contract in Aztec.nr. You will learn about private functions, public functions, composability between them, state management and creatively using nullifiers to prevent people from voting twice!
We will build this:
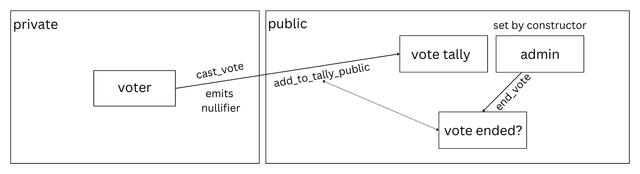
- The contract will be initialized with an admin, stored publicly
- A voter can vote privately, which will call a public function and update the votes publicly
- The admin can end the voting period, which is a public boolean
To keep things simple, we won't create ballots or allow for delegate voting.
Prerequisites
- You have followed the quickstart to install
aztec-nargoandaztec. - Running Aztec Sandbox
Set up a project
First, create a new contract project with aztec-nargo.
aztec-nargo new --contract private_voting
Your file structure should look something like this:
.
| | |--private_voting
| | |  |--src
| | |  |  |--main.nr
| | |  |--Nargo.toml
The file main.nr will soon turn into our smart contract!
We will need the Aztec library to create this contract. In your Nargo.toml you should see [dependencies] - paste this below it.
[dependencies]
aztec = { git="https://github.com/AztecProtocol/aztec-packages", tag="aztec-packages-v0.47.0", directory="noir-projects/aztec-nr/aztec" }
Initiate the contract and define imports
Go to main.nr and delete the sample code. Replace it with this contract initialization:
contract EasyPrivateVoting {

}
This defines a contract called Voter. Everything will sit inside this block.
Inside this, paste these imports:
use dep::aztec::prelude::{
    AztecAddress, FunctionSelector, NoteHeader, NoteInterface, NoteGetterOptions, PrivateContext,
    Map, PublicMutable, SharedImmutable
};
Source code: noir-projects/noir-contracts/contracts/easy_private_voting_contract/src/main.nr#L2-L7
We are using various utils within the Aztec library:
PrivateContext- exposes things such as the contract address, msg_sender, etcAztecAddress- A type for storing an address on AztecFunctionSelector- Used for computing a selector to call a functionMap- A data storage type for storing candidates with the number of votes they havePublicMutable- A type of storage, which holds a mutable public value. We'll store votes as PublicMutablesSharedImmutable- an immutable storage value that is accessible in private and public execution.
Set up storage
Under these imports, we need to set up our contract storage. Define the storage struct like so:
#[aztec(storage)]
struct Storage {
    admin: PublicMutable<AztecAddress>, // admin can end vote
    tally: Map<Field, PublicMutable<Field>>, // we will store candidate as key and number of votes as value
    vote_ended: PublicMutable<bool>, // vote_ended is boolean
    active_at_block: SharedImmutable<u32>, // when people can start voting
}
Source code: noir-projects/noir-contracts/contracts/easy_private_voting_contract/src/main.nr#L8-L16
In this contract, we will store three vars:
admin, as an Aztec address held in public statetally, as a map with key as the persona and value as the number (in Field) held in public statevote_ended, as a boolean held in public stateactive_at_blockspecifies which block people can start voting. This variable specifies the block at which people must use their nullifier secret key to vote. Because nullifier keys are rotatable, if this is not included the same account would be able to vote more than once.
Constructor
The next step is to initialize the contract with a constructor. The constructor will take an address as a parameter and set the admin.
#[aztec(public)]
#[aztec(initializer)] // annotation to mark function as a constructor
fn constructor(admin: AztecAddress) {
    storage.admin.write(admin);
    storage.vote_ended.write(false);
    storage.active_at_block.initialize(context.block_number() as u32);
}
Source code: noir-projects/noir-contracts/contracts/easy_private_voting_contract/src/main.nr#L18-L26
This function takes the admin argument and writes it to the storage. We are also using this function to set the vote_ended boolean as false in the same way.
Casting a vote privately
For the sake of simplicity, we will have three requirements:
- Everyone with an Aztec account gets a vote
- They can only vote once in this contract
- Who they are is private, but their actual vote is not
To ensure someone only votes once, we will create a nullifier as part of the function call. If they try to vote again, the function will revert as it creates the same nullifier again, which can't be added to the nullifier tree (as that indicates a double spend).
Create a private function called cast_vote:
#[aztec(private)] // annotation to mark function as private and expose private context
fn cast_vote(candidate: Field) {
    // Below, we make sure to get our nullifier public key at a specific block. By pinning the nullifier public key at a specific block,
    // rotating keys will have no effect on the nullifier being produced, and voting again after will fail because the same nullifier is computed each time the user votes.
    let header_at_active_at_block = context.get_header_at(storage.active_at_block.read_private());
    let msg_sender_npk_m_hash = header_at_active_at_block.get_npk_m_hash(&mut context, context.msg_sender());

    let secret = context.request_nsk_app(msg_sender_npk_m_hash); // get secret key of caller of function
    let nullifier = std::hash::pedersen_hash([context.msg_sender().to_field(), secret]); // derive nullifier from sender and secret
    context.push_nullifier(nullifier, 0); // push nullifier
    EasyPrivateVoting::at(context.this_address()).add_to_tally_public(candidate).enqueue(&mut context);
}
Source code: noir-projects/noir-contracts/contracts/easy_private_voting_contract/src/main.nr#L28-L41
In this function, we do not create a nullifier with the address directly. This would leak privacy as it would be easy to reverse-engineer. We must add some randomness or some form of secret, like nullifier secrets.
To do this, we make an oracle call to fetch the caller's secret key, hash it to create a nullifier, and push the nullifier to Aztec.
After pushing the nullifier, we update the tally to reflect this vote. As we know from before, a private function cannot update public state directly, so we are calling a public function.
Create this new public function like this:
#[aztec(public)]
#[aztec(internal)]
fn add_to_tally_public(candidate: Field) {
    assert(storage.vote_ended.read() == false, "Vote has ended"); // assert that vote has not ended
    let new_tally = storage.tally.at(candidate).read() + 1;
    storage.tally.at(candidate).write(new_tally);
}
Source code: noir-projects/noir-contracts/contracts/easy_private_voting_contract/src/main.nr#L43-L51
The first thing we do here is assert that the vote has not ended.
assert() takes two arguments: the assertion, in this case that storage.vote_ended is not false, and the error thrown if the assertion fails.
The code after the assertion will only run if the assertion is true. In this snippet, we read the current vote tally at the candidate, add 1 to it, and write this new number to the candidate. The Field element allows us to use + to add to an integer.
Refer to common patterns for more information about key rotation and considerations.
Getting the number of votes
We will create a function that anyone can call that will return the number of votes at a given vote Id. Paste this in your contract:
unconstrained fn get_vote(candidate: Field) -> pub Field {
    storage.tally.at(candidate).read()
}
Source code: noir-projects/noir-contracts/contracts/easy_private_voting_contract/src/main.nr#L60-L64
We set it as unconstrained and do not annotate it because it is only reading from state. You can read more about unconstrained functions here.
Allowing an admin to end a voting period
To ensure that only an admin can end a voting period, we can use another assert() statement.
Paste this function in your contract:
#[aztec(public)]
fn end_vote() {
    assert(storage.admin.read().eq(context.msg_sender()), "Only admin can end votes"); // assert that caller is admin
    storage.vote_ended.write(true);
}
Source code: noir-projects/noir-contracts/contracts/easy_private_voting_contract/src/main.nr#L53-L59
Here, we are asserting that the msg_sender() is equal to the admin stored in public state.
Compiling and deploying
The easiest way to compile the contract is with aztec-nargo. Run the following command in the directory with your Nargo.toml file:
aztec-nargo compile
This will create a new directory called target and a JSON artifact inside it.
Use aztec codegen to generate the Typescript artifact for the contract:
aztec codegen target --outdir src/artifacts
Once it is compiled you can deploy it to the sandbox.
Next steps
Now you have learned the foundations of Aztec smart contracts, you can start to play around with some more advanced features. Some ideas:
- Add some more features into this contract, like the admin can distribute votes, people can delegate their votes, or voteIds can have more data like names, descriptions, etc
- Go to the next tutorial and learn how to write a token contract